
Drilling Through Thick Glass: Techniques, Tools, and Tips for Clean Holes
Drilling a hole through thick glass is one of those jobs where patience matters more than brute force. Glass is hard, brittle, and unforgiving: excessive pressure, localized heat, or a poorly supported workpiece can turn a promising hole into a radial crack—or shatter the entire piece. Fortunately, with the right bit, cooling method, and technique, surprisingly clean holes can be made in substantial pieces of glass.
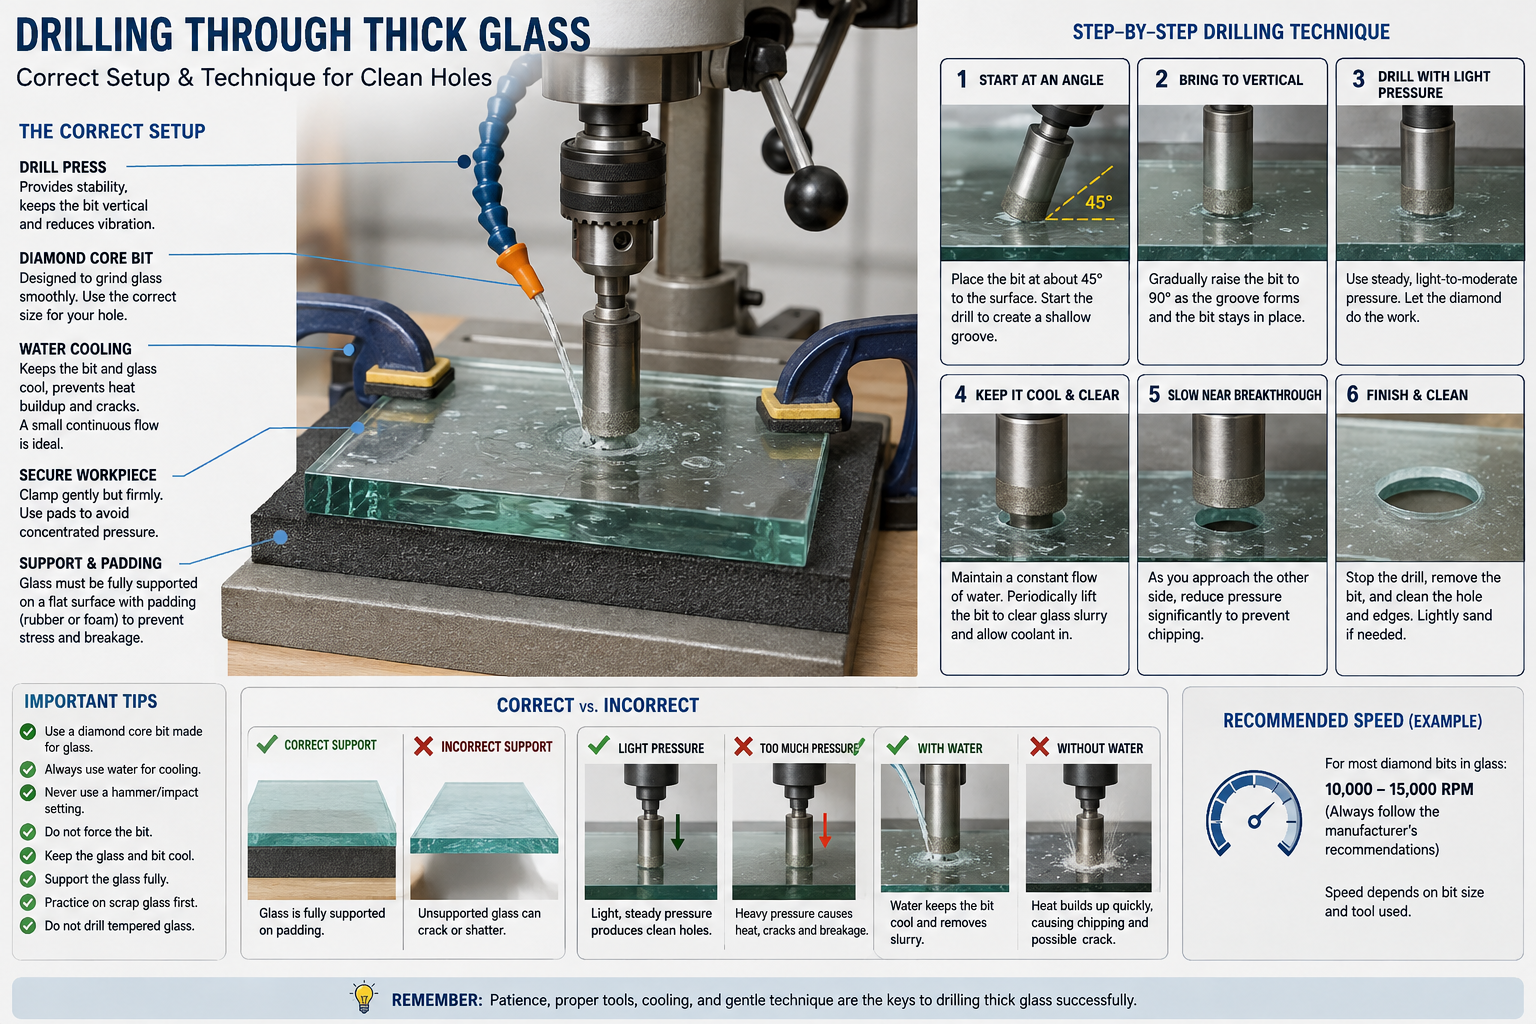
The basic principle is simple: grind the glass away gradually rather than trying to cut it aggressively. Diamond-coated drill bits and diamond core bits are particularly well suited to this task. Manufacturers specifically recommend diamond-impregnated bits for glass and emphasize securing the workpiece, avoiding excessive pressure, and using water or another suitable coolant.
1. Make Sure the Glass Can Be Drilled
Before doing anything else, identify the type of glass.
Ordinary annealed glass is generally the easiest to drill. This includes many panes, shelves, bottles, and decorative pieces.
Tempered glass should not be drilled. Its internal stresses are deliberately engineered so that, when damaged, the entire piece can suddenly break into many small fragments. Holes and cutouts normally have to be made before tempering.
Laminated glass presents another complication because it consists of glass layers separated by an interlayer. Drilling it requires techniques appropriate to the particular laminate.
If you aren't certain what type of glass you have, don't assume that it is safe to drill simply because it looks like ordinary glass.
2. Use a Diamond Bit
A conventional twist drill bit is generally the wrong tool. Glass is better treated as a material to be ground away.
For small holes, use a diamond-coated glass bit. For larger holes, a diamond-coated core bit is usually preferable. Core-style bits grind a ring rather than attempting to remove the entire area of the hole.
Dremel, for example, makes diamond-impregnated glass bits specifically intended for flat and curved glass. Its larger core-style bit incorporates openings that help remove material from inside the cutter.
For particularly thick glass, choose a bit with a working length and geometry appropriate to the full thickness rather than assuming a short hobby bit will make it through.
3. Support the Glass Properly
One of the most important rules is don't let the glass vibrate.
Place the piece on a flat, stable surface with a resilient layer underneath it. Rubber, dense foam, or another material that supports the glass without creating hard pressure points can work well.
If drilling a loose piece, clamp it carefully so that it cannot move—but don't clamp it so tightly that you introduce concentrated stress.
For a large or valuable piece, a drill press or dedicated diamond-drilling stand offers a major advantage because it keeps the tool aligned and makes it much easier to maintain consistent pressure.
4. Mark the Hole Carefully
Mark the center of the hole with a removable marker.
Avoid striking the glass with a center punch. The tiny impact that would be harmless to metal can initiate a crack in glass.
A useful trick is to put masking tape over the drilling area. The tape provides additional visual contrast for the mark and can help prevent the bit from wandering during the initial engagement.
5. Start at an Angle
A diamond bit can have difficulty establishing a bite if it is placed vertically on a smooth glass surface.
One manufacturer's recommended technique is to begin with the tool approximately 45 degrees to the surface, then gradually bring it upright as the groove develops.
The important point is to establish a shallow grinding track before applying the bit squarely.
Once the bit has created a circular groove, bring it to approximately 90 degrees and continue drilling normally.
6. Keep the Bit Cool
Heat is the enemy.
Grinding glass generates heat at the contact point. A diamond bit that becomes excessively hot can lose cutting effectiveness, and thermal stress can contribute to glass cracking.
Water is commonly used as a coolant for glass drilling. Dremel specifically recommends applying water or cooling liquid during glass drilling.
For a simple small hole, this can mean periodically applying drops of water to the drilling area.
For a deep hole in thick glass, however, intermittent drops may not provide enough cooling. A controlled wet-drilling setup that continuously supplies coolant is considerably better.
7. Be Especially Careful With Thick Glass
Thick glass creates a particular problem: the hole remains in contact with the cutting surface for a long time.
Don't compensate by pushing harder.
Instead:
- Use a suitable diamond core bit.
- Keep the cutting area continuously or frequently cooled.
- Use moderate, steady pressure.
- Periodically withdraw the bit to allow coolant and debris to enter the hole.
- Let the abrasive do the cutting.
- Stop if the glass begins heating significantly.
Professional diamond-drilling equipment similarly emphasizes adequate water flow because insufficient cooling can damage diamond segments or cause the bit to jam.
8. Don't Use Hammer Action
A hammer drill setting is appropriate for masonry, not glass.
Use rotary action only unless the particular manufacturer's instructions explicitly specify otherwise.
Impact forces are exactly what you are trying to avoid.
9. Let the Bit Do the Work
One of the most common mistakes is applying too much downward pressure.
You want the bit to grind gradually through the material. Heavy pressure doesn't necessarily make the process faster; it can instead increase heat, vibration, chipping, and the likelihood of cracking.
Think of the operation as grinding rather than drilling.
A steady hand and light-to-moderate pressure are usually preferable to forcing the bit.
10. Clear the Grinding Debris
As the hole gets deeper, powdered glass accumulates inside the cutting area.
That debris needs somewhere to go.
Core bits designed for glass may incorporate openings that help remove material from the interior of the cutter.
Periodically withdrawing the bit also allows fresh coolant to reach the cutting surface and helps flush away the glass powder.
11. Slow Down Near the Exit
The final part of the hole is often the most dangerous.
When the bit approaches the opposite surface, there is less material supporting the remaining glass. If you continue pushing at the same rate, the bit can suddenly break through and chip or fracture the exit side.
As you approach breakthrough:
- Reduce pressure.
- Keep the bit well cooled.
- Let the abrasive work slowly.
- Consider stopping when only a thin layer remains and finishing from the opposite side.
For a particularly important piece, drilling partway from one side and then completing the hole from the other can substantially reduce breakout.
The two holes need to be carefully aligned, however.
12. Consider a Drill Guide
For thick glass, keeping the bit perfectly vertical by hand becomes increasingly difficult.
A simple guide or drill stand can make a major difference.
A rigid setup:
- keeps the hole straight,
- prevents the bit from wandering,
- reduces lateral forces,
- makes pressure easier to control,
- and makes long drilling operations less tiring.
Professional diamond-drilling systems use drill stands and water-management equipment for precisely these reasons.
13. Use the Right Speed
There is no universal RPM for every glass-drilling setup. The correct speed depends on bit diameter, bit construction, tool type, and the manufacturer's instructions.
As one example, Dremel lists 10,000–15,000 RPM for its small diamond glass-drilling accessories.
Don't automatically assume that a larger core bit should be run at the same speed. Follow the specifications for the particular bit.
14. Protect Yourself From Glass Dust and Fragments
Wear appropriate eye protection whenever drilling glass.
A face shield can provide an additional layer of protection, particularly when working with large or thick pieces.
Gloves can protect against sharp edges during handling, but they should never substitute for careful workholding. Keep hands away from the rotating bit.
Wet drilling is useful not only for cooling but also because it suppresses airborne glass dust. If dry drilling is unavoidable, use appropriate dust extraction and respiratory protection for the material and tool being used.
15. Watch the Edges
Don't place a hole too close to an edge unless the design specifically calls for it.
The narrower the remaining strip of glass around the hole, the less structural material there is to resist cracking.
Corners are particularly vulnerable because stresses can concentrate there.
As a general rule, give the hole as much surrounding material as the design allows.
16. Don't Drill Valuable Glass Without a Test
If the glass is expensive, irreplaceable, antique, architectural, or otherwise important, practice first.
Find a scrap piece of similar thickness and composition and drill several holes.
This lets you determine:
- the appropriate bit,
- drilling speed,
- coolant method,
- amount of pressure,
- and how the particular glass behaves at breakthrough.
That small experiment can save an expensive piece.
A Basic Procedure
For ordinary thick, non-tempered glass, the process can be summarized as follows:
- Identify the glass and make sure it is suitable for drilling.
- Select a diamond glass bit or core bit of the desired diameter.
- Secure the glass on a stable, padded surface.
- Mark the hole without striking the glass.
- Set up water cooling or another manufacturer-approved coolant.
- Start the bit at an angle to establish the groove.
- Gradually bring it perpendicular to the glass.
- Maintain steady, light pressure.
- Keep the cutting area cool.
- Withdraw the bit periodically on deep holes to clear debris and introduce fresh coolant.
- Reduce pressure near breakthrough.
- Clean and inspect the finished hole for chips or cracks.
The Golden Rules
If only a few things are remembered, they should be these:
Diamond bit.
No impact.
Secure the glass.
Keep it cool.
Don't force the bit.
Slow down at breakthrough.
Thick glass is not necessarily difficult to drill; it simply gives you more opportunity to make a mistake. The successful approach is controlled abrasion, good cooling, rigid support, and patience. With those fundamentals in place, even fairly substantial glass can be drilled cleanly and predictably.